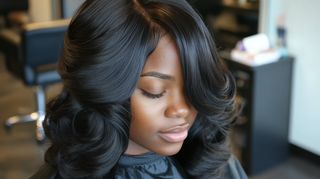
Trying wigs for the first time is exciting yet daunting. Use this guide to look stylish or boost confidence during hair loss. You'll learn how to put on a wig properly and keep it looking fabulous. For hands-on help, book a session with a wig expert hairstylist. With the right tools - wig cap, brush, styling products, and accessories - you'll soon be a skilled wig wearer. Follow these steps to transform your look in no time.
Step 1: Hair Preparation
For a flawless and firm fit of your wig, it's vital to first make your natural hair as flat and sleek as it can be. Uneven or bumpy hair beneath your wig could make it appear crooked and less secure.
For Short Hair
Start with a bit of water on your hair, or use some styling gel if needed to make it smooth. Take a brush and kindly comb your hair away from your face and forehead. When your hair is neatly combed back, use tiny bobby pins to keep it tight to your scalp. Make sure the pins lie flat and are comfy, reducing any lumps or unease.
For Long Hair
Having long hair means you need to put in some extra effort. This ensures that no bumps form under your wig. First, dampen your hair with water. This makes it easier to manage. You have a few choices for styling to keep your hair flat:
- Low ponytail: Tie your hair up into a ponytail at the nape and then flip it over your head, letting the tail lie flat on your head where the wig will be placed; use bobby pins to secure the end.
- Braids: Depending on the thickness of your hair, divide it into 2-4 parts and plait them tightly. Wrap these around your head like a crown while fastening every end with a bobby pin, which should be equally spaced on your scalp.
- Cornrows: Those with type 3 or 4 hair should consider this method of keeping their hair under control since it distributes weight evenly without creating extra bulk underneath due to tightness against one’s own scalp. Flatness also makes the cap fit tightly and snugly, thereby making everything look seemingly natural (especially works well when the wig line extends far beyond the forehead area).
Securing Your Hair
When securing your hair with pins or braids, ensure they hold firm but are not too tight. Toupee clips may be considered for people with thicker or more voluminous locks. These clips can accommodate larger sections of hair at once because of their size, thus making sure whatever style one chooses stays fixed firmly beneath the wig covering your entire head.
Always check to see that all pins and clips lie flat against your head when learning how to wear a wig. This will help keep them from hurting during the day after wearing heavy headgear. This pro tip is aimed at adding a touch to both how good her wig looks and enhancing its wear comfortability throughout the day, having smoothly secured hairs that do not give bumps again.
Step 2: Wig Cap Application
It's important to have a well-adjusted wig cap for a real-feel wig wear. The wig cap does more than just make your under-hair neat. It also keeps your head from feeling itchy and stops the wig from sliding off.
Choosing the Right Size
Picking a wig cap that matches your head size is key to prevent discomfort. Check out the usual wig cap sizes based on your head's circumference:
| Cap Size | Head Circumference |
| Child | 19" (48.3cm) |
| Petite | 21" (53.3cm) |
| Petite/Average | 21.5" (54.6cm) |
| Average | 22" (55.8cm) |
| Large | 23" (58.4cm) |
The right wig cap size is essential. Employ a soft measuring tape to snugly, yet comfortably, measure your head.
Selecting the Material
Wig caps come in different materials, each suitable for various needs:
- Cotton: Best for sensitive scalps or hair loss. Cotton is gentle and reduces friction.
- Nylon/Mesh: This lightweight option works well for people with their own hair. It adds minimal bulk under the wig.
- Aloe Vera/Bamboo: These materials are durable and comfortable. Bamboo is especially useful for wicking moisture. It's excellent for warm weather or those who sweat a lot.
Applying the Wig Cap
Follow these steps to apply the wig cap securely:
- Positioning the Cap: Hold the wig cap by the elastic edge with both hands. Tilt your head slightly forward. Place the front of the cap on your forehead.
- Pulling Over: Gently stretch the cap over your head. Move from the forehead down to the nape of your neck. This method covers all your hair and prevents the cap from snapping back.
- Adjusting for Fit: Once the cap is on, gently pull the edges. Make sure it sits comfortably and covers all your hair. It should fit securely around your head without being overly tight.
- Securing Hair and Edges: Tuck any stray hairs or flyaways under the cap. Make sure all your hair is neatly contained. This prevents lumps or bumps under the wig.
Pro Tip: Wearing a wig the right way is important. Select a wig cap color that closely matches your skin tone. This makes the hairline look natural, especially for lace front wigs or styles pulled back.
With the wig cap secure, you're ready to fit and style the wig for a smooth, polished look.
Step 3: Securing the Wig
Securing the wig properly keeps it comfortably in place all day. You have the option to select from various methods tailored to your preference and the style of your wig:
- Wig Glue: Great for lace front wigs, wig glue has a stronghold. Apply a thin layer along your hairline, let it set by air drying or using a cool blow dryer, then press the wig firmly against the glue.
- Wig Tape: Like glue but easier to remove with less residue, cut wig tape into small strips. Place them inside the wig along the hairline. Once ready, peel the backing off, place the wig, and press down to secure.
- Bobby Pins: A temporary, adjustable option. Choose pins matching the wig color. Slide them between the wig cap and your hair, distributing them evenly for a secure fit.
- Wig Clips: For frequent wig changes or a temporary solution, sew clips into the wig cap. Secure about four to six clips, then fasten them to your hair or wig cap after positioning the wig.
There are many ways to fix a wig. You can pick the best way for you based on how you live, what wig you have, and how often you wear it.
Smart Idea: If you use glue or tape, wrap a scarf or bandana around your hairline. This can help set the adhesive and stop irritation.
| Method | Description | Benefits | Best for |
| Wig Glue | Strong adhesive applied along the hairline | Seamless, long-lasting hold | Lace front wigs, extended wear |
| Wig Tape | Adhesive strips placed along the hairline | Easy to apply and remove, less residue | Short-term wear, sensitive skin |
| Bobby Pins | Pins that secure the wig to your natural hair | Easy to adjust, minimal tools needed | Everyday use, quick adjustments |
| Wig Clips | Clips sewn inside the wig that attach to your hair | Secure yet removable, adjustable | Frequent wig users, those who change wigs often |
The right method makes your wig look natural and feel secure. You can move confidently all day.
Step 4: Placing the Wig
Positioning your wig properly is important. It looks natural and feels comfortable all day. Initially, it might require several attempts. But with practice, it will become easier.
Hold the wig with both hands. Put your fingers on either side of the base. Tilt your head forward a little. Place the wig's edge above the nape of your neck. Slowly pull the wig over the top of your head toward your forehead. Keep the wig aligned with your natural hairline.
If using wig glue or tape, press down gently along the hairline once in position. This helps the adhesive bond with your skin and secure the wig. Apply even pressure to avoid bumps or gaps between the wig and scalp.
If using clips or bobby pins, secure one side of the wig first. Gradually work your way around, fastening as you go. This lets you adjust and place the wig evenly and comfortably.
Pro Tip: After placing, check for looseness. Many wigs have adjustable straps or tabs at the back. If loose, use these tabs to tighten until secure yet comfortable on your head. This helps maintain the natural look throughout wear.
Step 5: Wig Adjustment
Making sure your wig fits appropriately and snugly is the final step in putting it on. Adjusting it correctly affects how natural it looks and how confidently you can wear it all day.
Once your wig is on, test if it's secure: gently shake your head back and forth. This should help you feel if the wig might move or slide. If you notice any shifting or looseness in certain areas, you may need to add more ways to secure it. If you used wig glue initially, apply more along the hairline. Or, add extra bobby pins or wig clips in areas that need more support.
Be careful when adding any new securing methods that you don't make it too tight, which could cause discomfort or headaches. After adjusting, shake your head gently again to make sure everything is perfectly in place.
Finally, step out with the confidence that comes from wearing your wig. Always remember, self-assurance is the best accessory for any look. Embrace your new appearance and how versatile your beautifully styled wig is. Your confidence will shine through, making your wig look even more amazing.
Pro Tip: Always double check your wig's alignment after any adjustments, especially around the ears and nape of the neck. These areas are key for a natural look and comfort. If not aligned properly, it can cause discomfort and look less natural. Adjust as needed so the edges lay flat and the fit feels right.
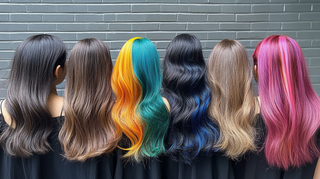
Choosing the Best Wig for Your Needs

Finding the right wig can be exciting, with so many options available. Styles, textures, colors, and cuts allow for endless combinations. It might seem confusing, but measuring your head properly ensures the perfect fit. Measuring accurately from different angles is important, especially for custom wigs.
Precise Head Measurements for a Flawless Fit
First, measure the circumference around your head from the front hairline to the base of your skull. Next, measure from the front hairline down to the nape of your neck. Measure ear to ear across your forehead and over the top of your head. Finally, measure temple to temple across the back of your head. Getting these measurements right is crucial for lace front or custom wigs, ensuring a seamless, natural look.
Choosing the Right Wig Type for Your Needs
Different wig types cater to different needs. Three main types exist: synthetic, human hair, and a blend of both. Synthetic wigs are budget-friendly and low-maintenance but limited in styling versatility. They might work best for occasional use like costume parties. Human hair wigs provide the most authentic appearance and complete styling versatility, although they demand more maintenance. These wigs are ideal for those seeking versatility and an authentic appearance.
- Synthetic Wigs: Cost-effective, low-maintenance, limited styling options. Good for occasional use.
- Human Hair Wigs: Natural appearance, fully styleable, but higher maintenance. Perfect for versatility and authenticity.
- Blended Wigs: Blended wigs are a nice middle choice. They mix fake hair and real hair parts. This makes them cheaper than fully real hair wigs but nicer than all fake hair wigs. Additionally, they require relatively low maintenance.
- Lace Front Wigs: Lace front wigs have a really natural-looking hairline. This lets you part your wig hair many ways - unlike regular wigs where the part is fixed and can't change.
Think about when and where you'll wear your wig before you buy it. Picking the right type for your needs - like for daily wear or special events - can really improve your overall look and make you feel confident and great.
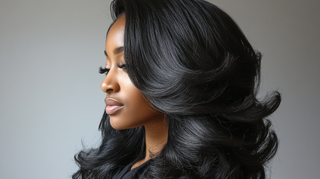
Making Wigs Look Great
Styling a wig lets you try out new looks. When you get a new wig, shake it gently first. This relaxes the fibers so the hair falls naturally. Handle your wig with care when styling it. Use special wig products:
- Styling Human Hair Wigs: These wigs are easy to style in different ways. First, use a detangler and heat protectant. This keeps the hair safe from heat damage. Brush the hair well. Then, you can use hot tools like curling or flat irons to style it. At the end, use a light hairspray to hold the style.
- Styling Synthetic Hair Wigs: For these wigs, don't use brushes or combs. These can frizz or damage the fibers. Use your fingers to untangle any knots instead gently. Only use products made for synthetic wig hair. Most synthetic wigs can't withstand high heat from styling tools unless they are heat-resistant.
Pro Tip: Use a wig stand or styling head to style your wig easily. You can see all angles this way. It's also easier to reach the back and sides. Use T-pins to secure the wig to the stand so it doesn't move around. Styling on a stand gives better results and protects your wig.
How to Maintain and Clean Your Wig?

Cleaning your wig regularly is essential to keep it fresh and long-lasting. If you wear your wig every day, clean it every two weeks. If you wear it less often, clean it once a month.
To clean a human hair wig:
- Soak the wig in warm water with a small amount of wig shampoo and conditioner.
- Gently scrub the hairline with your fingers or a soft toothbrush, mainly if you use tape or glue, which can leave residue.
- Allow the wig to absorb the solution for a few minutes. Then, rinse it thoroughly to remove all the product.
- Place the wig on a microfiber towel to absorb excess water. Let it air dry naturally.
For synthetic wigs, the process is slightly different:
- Soak the wig in cold water with a small amount of shampoo and conditioner made for synthetic fibers.
- Use your fingers or a toothbrush to scrub the hairline and remove buildup gently.
- Allow the wig to soak for several minutes. Rinse it thoroughly. Gently squeeze out excess water.
- Place the wig on a microfiber towel to absorb the remaining moisture. Let it air dry.
Always follow the specific care instructions for your wig. Different materials may require different care routines. The tips above are generally applicable, but your wig may have unique needs depending on its fiber type and construction.
Removing Wig Glue
Taking off wig glue, especially from lace front wigs, requires careful steps to avoid damaging the delicate material:
- Alcohol-Based Solution: First, do a skin test to check for irritation. If all is good, use a damp microfiber cloth with rubbing alcohol. Gently rub it along the wig edges. Let it sit for a bit, then carefully lift the wig. Use an alcohol-dampened towel or cotton swab to remove any remaining glue.
- Emollient Oil: Apply a thin layer of Vaseline or similar oil along the hairline. Let it sit for several minutes to soften the glue. Next, use a damp towel to wipe off any remaining residue. Repeat if needed to dissolve the glue fully.
- Specialized Lace Front Wig Glue Remover: Use a cotton ball or swab dipped in the remover. Apply it to areas where glue was used. Allow it to work for a few minutes. Then gently peel the wig away from the skin.
To effectively cleanse away glue residue, begin by gently wiping the area with a moistened cloth. Next, soak a sponge in rubbing alcohol and apply it to the glue spots. Let it soak in for a couple of minutes. Then, wash the wig as usual. This method cleans deeply while protecting the wig base and fibers.
FAQs About Wearing Wigs
What is the Typical Lifespan of a Wig?
The lifespan of a wig varies significantly, ranging from several months to multiple years, influenced by factors such as the type of wig, frequency of use, and the quality of maintenance. To make your wig last longer, handle it gently when brushing. Use a special wig brush or comb. Start brushing from the ends and move up. This reduces damage to the fibers. How you store your wig is also essential. Keep it on a wig stand, in a silk bag, or on a pillowcase. These prevent tangling and matting. Washing your wig less often and removing adhesives carefully can also help. High-quality wigs usually last longer, look more natural, and fit better.
Is It Necessary to Wear a Wig Cap Under a Wig?
Wearing a wig cap under your wig is a personal choice. Some people don't wear one in hot weather for better airflow on their scalp. Or if they have very short or no natural hair, a cap may seem unnecessary. But a wig cap has benefits. It protects your scalp from the wig. It helps manage your natural hair underneath. And it gives the wig more grip to stay in place. Depending on how you attach the wig, a cap can make it more comfortable and stable on your head.
Can Wearing a Wig Daily be Harmful?
Putting on a wig each day won't hurt you. In fact, it may help your natural hair grow! But it's wise to care for your scalp and hair. Take off the wig at night to let your scalp breathe. This prevents irritation, discomfort, or natural hair damage. Use oils like jojoba and moisturizers often. Doing this keeps your natural hair and scalp healthy. You get to wear your wig and have healthy hair underneath!
Will my Wig Stay Securely in Place Throughout the Day?
Yes, if you fit and secure it properly, your wig won't shift around during the day. Choose the right size. Avoid air pockets; these mean a poor fit. Use bobby pins, glue, or tape to hold your wig in place. Select the secure method that fits your activity level and comfort. Many wigs have tightening straps too. Adjust these if your wig feels loose. Proper application and securing techniques ensure your wig looks great and feels comfortable, no matter what you do!