Are you ready to relive a moment of your childhood or teenage years? Remember when you used to look for quick ways to color your hair without having to use any harsh chemicals? Well, stylists and some Youtube DIY experts are bringing back the trend with a watercolor hair method.
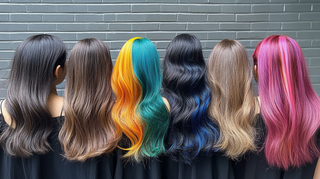
If you’ve noticed celebrities rocking those pretty pastels color extensions and even colors like rose gold and lime green, more than likely it was achieved using the watercolor method.
Coloring your extensions using the watercolor method is different from a salon coloring process because the color is achieved in minutes and eliminates the use of any bleaching chemicals. The trend has been making its way back and became increasingly popular after SZA debuted her lime green hair on social media.

Watercolor hair is perfect for the summer because the light colors look amazing in the sun, but it’s also perfect because this method saves you both time and money. Using the watercolor method on your extensions is something you can do at home whether you’re an amateur or expert hair stylist.
So, you’re ready to try out the watercolor method on your extensions but before beginning, here’s a quick checklist of everything you’ll need:
-1 Bottle of the hair color of your choice (or 2 if you’re going for a more bold color)
-613 Extensions
-Plastic spoon or whisk
-Large glass or plastic bowl
-Warm tap water
-Gloves
Now, the fun part begins. The pastel color you’ve been adding to your Pinterest board for weeks is becoming your reality with just a few easy steps.
Step 1: Prep your hair. Make sure all rubber bands, labels, and any plastic ties are removed from your extensions. Also, take the time to unravel and detangle the hair so that you’re able to handle it with just one hand.
Step 2: After placing your extensions to the side, it’s time to prepare your watercolor bath. Start running water and allow for it to get warm. You don’t want it scolding hot, just warm enough to ensure the color will take to the extensions effectively. While you wait on the water, take the bottle of color you’ve picked out and pour it into your glass (or plastic) bowl. You can add a few drops of water to your bottle of color to make sure you get all of the color to come out. No drop left behind!
Now, your water should be warm enough for you to add. Fill your bowl up with ¾ of the warm water and use your plastic spoon or whisk to blend the color and water.
Step 3: Finally, it’s time! Your watercolor dye is ready. Take your extensions and place them directly in the bowl of color. Lay all of your extensions in the color bath and do not take them out until you see that the water is completely clear. Once the water is clear, that means that the extensions have absorbed all of the color.

Finish up with the process by allowing the hair to dry and treat the hair with the conditioner of your choice. See, the watercolor method is simple, right?! Get started on your summer look today!


